


10 Top Tips For New Logic Pro Users

10 Top Tips For New Logic Pro Users
I remember when I first started getting into music production using Garageband and then made the step-up and downloaded Logic Pro X. I couldn’t wait to start making music, however, found out very quickly that the transition would be a bit more difficult than expected - to put this into context, it nearly took me 2 weeks to find the instrument section in Logic! Anyway, that was some few years ago now and I like to think I know a little bit more about this DAW than I did back then, and so I thought it would be a good idea to put together a little list of some of my favourite tips and tricks when starting out on Logic Pro X - so as to save you all from repeating my mistakes. Don't forget the best way to learn how to produce music with Logic or other DAWs like Ableton is to get 1-2-1 tuition. It's the fastest way to learn in-depth, you're music productions skills will thank you! Click here to view our range of 1-2-1 Music Production Courses!
So, without further adieu, let’s get started…
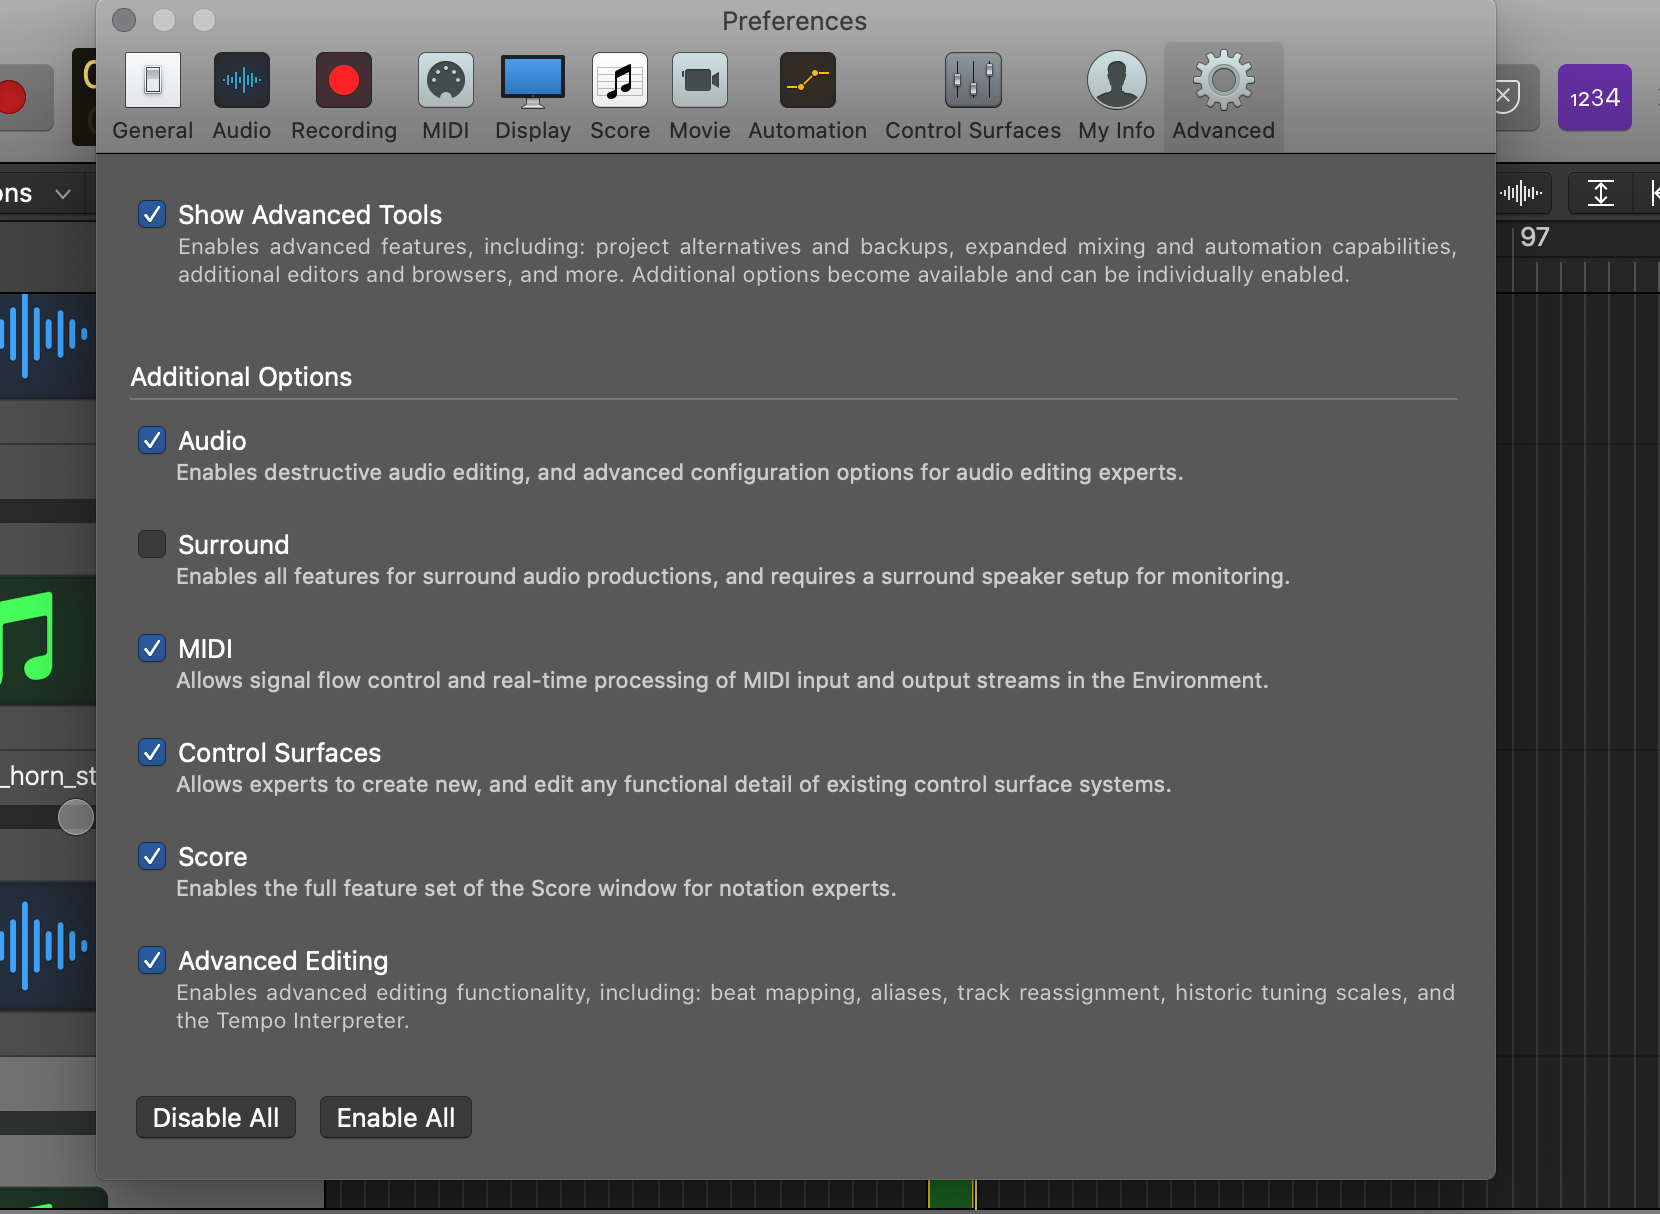
1) Turning On Advanced Settings
When first loading Logic Pro X, you may notice that your project interface looks very much like Garageband and not like the more complicated Logic Pro. This can be very frustrating if you don’t know the reasons why, however, fortunately, the solution is very simple. All you need to do is go to Logic’s Preferences (you can access this from the drop-down menu in the top left - or if you want to be a real computer whizz you can hit the Command Key and comma key) and then go to the Advanced panel and turn on Advanced Settings. Once this is done you will be able to use Logic Pro X in all its glory!
2) Turn On Custom for Project Settings
So, this is a tip for both novice Logic Pro users and also the veterans among you. In the top middle of the screen, you will see there is a black panel which contains the info about your project - such as Tempo, Key and Time Signature. Well, to the right of that you will see a small down arrow and if you click that you will see you have various different options for what information will be displayed in the panel, eg. you can have the length of the track in minutes and seconds instead of displaying the Key etc. Well, if you change this section to Custom, you are able to see a few extra details which can really help you further down the line. Two of the most useful are the CPU Load and the Hard Disk Throughput features on the right side of the display. These allow you to see what plugins may be using the most processing power which may be causing your Mac to slow down and this can help you alter your project so that it doesn’t crash every time you hit play.
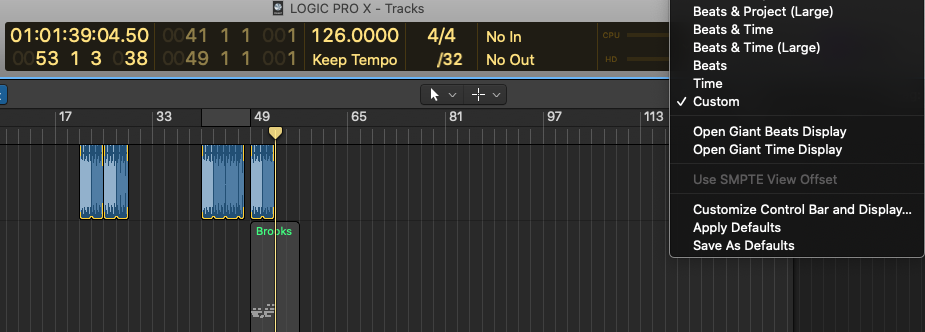
3) Switching your Grid zoom to /16 or /32
Following up from the previous point, when on the Custom panel you can also see there is an option to change the grid division displayed in the Tracks area. What this means is that you can zoom in much further when either arranging audio or when you’re working in the Piano Roll and allows for extra precision when working on your track. I especially find writing in the /32 division very useful when working on my drum patterns (in particular hats) as I think it’s easier to apply any Quantize features such as swing as you can see the changes more clearly - instead of the constant overlapping of notes.
4) Turn On Snap Automation
So, again this is a tip for everyone really. When working on automating your track (you can access automation but hitting the ‘A’ key), you may have found already that it can be pretty hard to get your automation points to be exactly on point - unless you’re using the marquee tool. With this being the case, it may be due to you not having Snap Automation turned on - you can turn this setting on by selecting the Snap Pop Up menu and then clicking on Snap Automation and proceeding to select Active (also make sure Snap to Grid is turned on). This now means that when you add a new automation value, the point will be exactly in line with the grid.
Come to think of it, while we’re on the subject of automation, here’s a handy little shortcut for you. If you hold the ctrl key while clicking and dragging your automation point, you can move in much smaller, controlled intervals thus putting an end to the arduous task of trying to make all your values exactly the same!

5) Click and Hold The Stereo Output Button
There are some processes in mixing and production that rely on signals that don’t actually have outputs - putting it simply, they have a signal but you can’t hear them. For instance, when sidechaining a bass line to a kick drum, you may want to use a separate, inaudible signal as the trigger for the sidechain compression to occur. In order to achieve this, you need to hit the Inspector button (it looks like an Info symbol) on the top left of the screen and this will bring up the channel of your track. Then you need to click and hold on the button at the bottom middle (under the Instruments section) of the channel strip that says Stereo Output, and from here you can select No Output. You also have the option of changing the output to be routed to a Bus if that’s something you’re into.
6) Flex-Time Imported Audio and Instant Transposition and Gain Change of Samples
Slightly wordy heading I know, but this is because I’m including three tips in one, so hopefully you’ll forgive for that!
So, first, we’re going to tackle the Flex-Time function in Logic Pro X. Essentially Flex-time allows you to quickly alter the BPM of the sample or audio file you are editing resulting in a much quicker workflow. In order to do this, you just need to click on the Show Flex button, to the right of the Automation button - or you can use the shortcut cmd + F. Then you need to turn on Flextime on your audio channel - the icon is the same as the Show Flex button - and then lineup the audio and you’re good to go!
Now, onto the matter of quick transposition and gain change of audio. So, if you want to quickly change the pitch of a sample you can, thanks to the transposition feature in Logic Pro. All you need to do is highlight the audio you want to change and then click the down arrow on the Region section on the left side of your screen. From here, you will see a Transpose option and you can then alter the pitch either by semitones or by Fine-Tuning if you want the change to be more subtle. Also, in the same section, you will see a Gain option and this allows you to alter the Gain of the selected audio region instead of having to change the volume on the channel fader. Pretty neat, right?!

7) Pack Your Folders
When working with audio, your project can get very messy very quickly. This is only natural, however, there is a very simple way to tidy up your samples a little and just make your life that little bit less stressful. That is by utilising the Pack Folder option. To do this you just need to highlight a selection of audio - this can be one channel such as a Kick drum, or multiple channels such as a drum kit - then right-click and select the Pack Folder option. What this does is then put all your audio into one folder, allowing you to copy, loop or simply drag your audio around your project all at once, making your workflow quicker and your screen less cluttered.

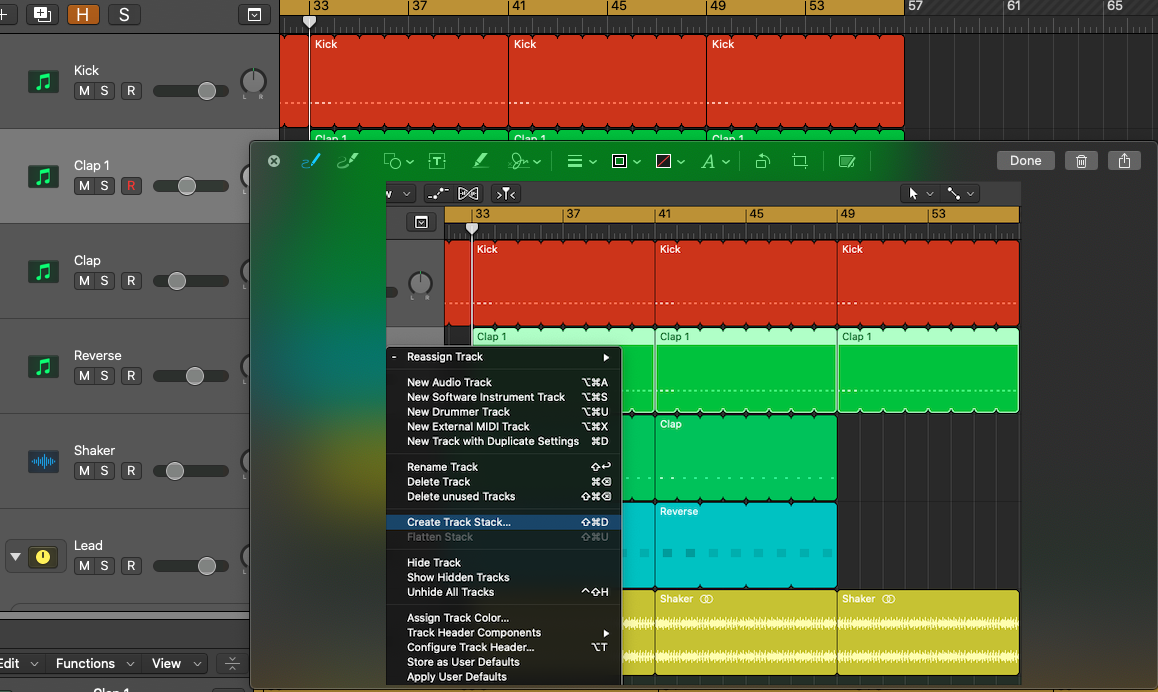
8) Stack Your Tracks
Similarly to the Packing Folder option, you can also group individual tracks together via the Track Stack option. To do this you just need to highlight a channel you would like to group, then right-click and select Create Track Stack from the dropdown menu. This then allows you to add multiple tracks to the same group, meaning you can process them altogether (and save on CPU) and also control their levels with one fader. One good example of where track stacks are especially useful is when you are creating your drum kit. Stacking your tracks also has the benefit of making your whole arrangement look neater which is always a bonus!
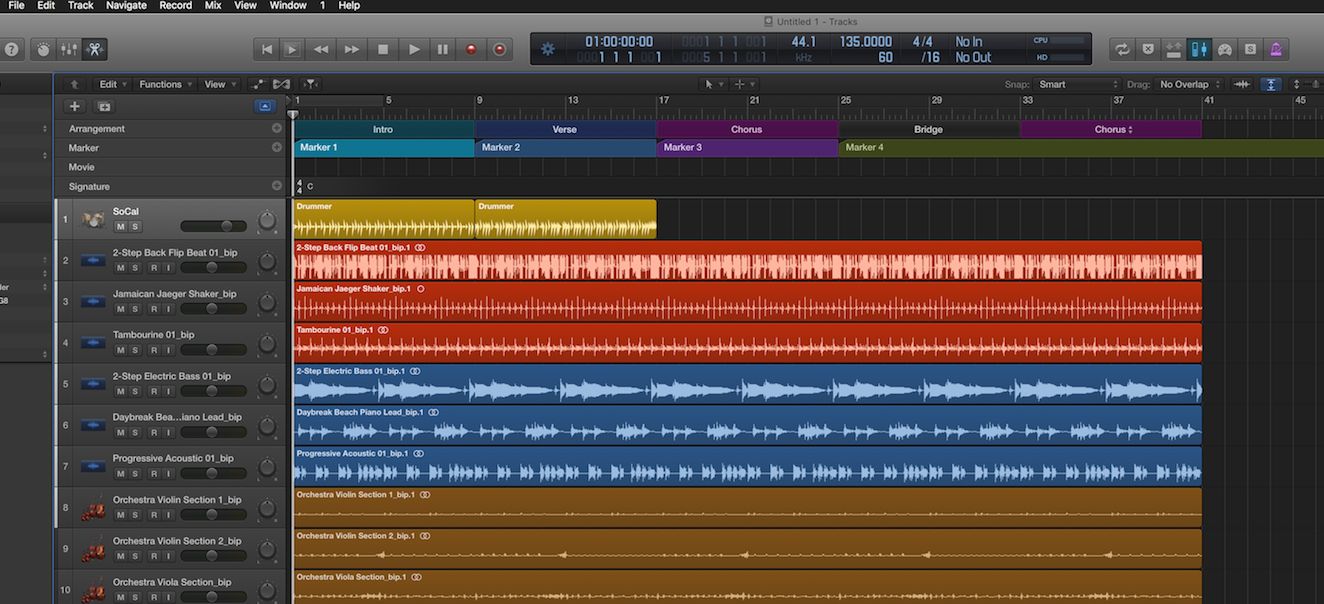
9) Use Markers
So, Markers are a great way to help you get to grips with the arrangement of your track. To create a Marker all you need to do is click on the Global Tracks button located just below the automation button - or you can just hit the letter G on your keyboard. Once this is done, you will then see a drop-down menu with an option to add a Marker - just hit the + plus sign and your good to go. I personally use Markers to aid with song structure - for example, I will place separate markers for my Intro, Verse, Chorus 1, Verse 2, Chorus 2 and Outro - as you can also quickly play from these individual sections by clicking on the designated marker.
10) Alt - Click and Drag
By far my most used (and most loved) shortcut, I think it’s only right we end our list with the Alt-click and drag. So, this shortcut allows you to copy and paste anything in your project almost instantaneously, whether that be a lead melody or a whole chorus, making it essential in speeding up workflow. The only thing to note is that you need to let go of your mouse before letting go of the Alt (option) key otherwise the shortcut won’t work.
Further Learning With DJ Gym
Well, there you have it. Here are 10 of my most used tips and tricks for Logic Pro X users, and whether you are a newbie to this DAW or a seasoned veteran, I hope you have found this list helpful. If you would like to see another list of my favourite tips and tricks for Logic Pro, or if you think I’ve missed some out, then please feel free to let me know - I would love to hear from you!
I strongly recommend that all newbie producers save time by seeking 1-2-1 music production tuition. We offer a full range of production courses on Logic Pro or Ableton. For more information about our courses or to enrol click here to contact us. You can also join our thriving online community of students, alumni and followers. Click here for our Facebook group.
Thank you for reading and I hope you have a great day!
Paul Dempsey